Forget everything you thought you knew about achieving perfectly crispy and juicy chicken tenders without the hassle of a deep fryer. If your quest for restaurant-quality chicken tenders at home has often ended in soggy breading or dry meat, prepare to have your culinary world transformed. We're diving into the secrets behind creating the ultimate Healthier Crispy Baked Chicken Tenders: A Family Favorite Recipe that are shatteringly crisp on the outside, incredibly tender and juicy within, and bursting with savory flavor. These aren't just chicken tenders; they're an experience – a testament to how simple ingredients, when prepared with clever techniques, can yield truly spectacular results.
There's something uniquely comforting about a plate piled high with golden-brown chicken tenders, ready for dipping into your favorite sauce. This recipe delivers all that nostalgic goodness and more, making it a guaranteed hit with everyone from picky eaters to gourmet enthusiasts. Best of all, it achieves this elevated status using your oven, making for a significantly healthier and less messy alternative to traditional frying. The aroma of toasted breadcrumbs and savory spices filling your kitchen as these crisp up is simply irresistible.
Why These Baked Chicken Tenders Stand Above the Rest
Many recipes promise crispy baked chicken, but few deliver with the consistent crunch and succulent interior of this method. What sets these Restaurant-Quality Baked Chicken Tenders: The Secret to Crispy Panko apart are two ingenious steps that elevate them from good to absolutely unforgettable: a unique flavorful batter and a coating of buttery, pre-toasted panko breadcrumbs. This isn't just about combining ingredients; it's about a strategic approach that maximizes texture and flavor.
The Magic of the Batter
The secret to perfect breading adhesion and an extra layer of moisture begins with a specialized batter. Instead of simply dredging chicken in egg and then breadcrumbs, we first toss the chicken in a carefully crafted mixture. This batter serves multiple crucial functions:
- Superior Adhesion: A thicker batter creates a robust sticky surface for the panko breadcrumbs to cling to, ensuring a comprehensive, even coating that won't flake off during baking.
- Enhanced Juiciness & Tenderness: The inclusion of sour cream in the batter is a game-changer. Its slight acidity helps tenderize the chicken while adding a crucial layer of moisture, protecting the meat from drying out in the oven. The flour thickens the batter, helping to seal in those precious juices.
- Subtle Flavor Elevation: While you won't taste them overtly, hints of Dijon mustard, a dash of hot sauce, and a touch of honey are subtle flavor enhancers that create a complex, well-rounded profile. They add a sophisticated depth that distinguishes these tenders from a basic recipe, proving that sometimes, the best flavors are the ones that quietly work in the background. Trust the process here; these ingredients are culinary maestros, not flavor bullies.
The Unbeatable Panko Perfection
If you're aiming for ultimate crispiness, panko breadcrumbs are your best friend. Their larger, flakier structure provides a much crunchier texture than traditional breadcrumbs. But this recipe takes it a step further:
- Buttery Toasting: Before the panko even touches the chicken, it's tossed with melted butter and lightly toasted in the oven. This crucial step serves two purposes:
- Intensified Flavor: Toasting the panko brings out a nutty, deeper flavor that raw breadcrumbs simply can't offer.
- Guaranteed Crispness: Pre-toasting ensures the panko is already on its way to golden perfection before it even coats the chicken, eliminating any risk of soggy spots and providing an incredibly satisfying crunch. The butter not only aids in crisping but also imparts a rich, savory depth.
- Parmesan Umami: A sprinkle of grated Parmesan cheese mixed into the toasted panko isn't just for show. It adds a delightful savory, umami note that complements the chicken beautifully, enhancing the overall flavor profile without being overtly cheesy.
Mastering the Art: Step-by-Step Guide to Crispy, Juicy Tenders
Achieving these perfect baked chicken tenders is a straightforward process, but paying attention to these key steps will guarantee success every time.
Prep & Marinate for Flavor
- Chicken Preparation: Start with boneless, skinless chicken breasts or tenderloins. If using breasts, slice them lengthwise into 3-4 even strips. For optimal tenderness and even cooking, place the chicken strips between two pieces of plastic wrap and gently pound them to a uniform thickness (about ½-inch) using a meat tenderizer or a rolling pin. Season generously with salt and freshly ground black pepper on both sides.
- Crafting the Marinade/Batter: In a medium bowl, whisk together the egg, sour cream, flour, Dijon mustard, hot sauce, and honey until smooth. This is your magic batter.
- Marinate: Add the prepared chicken strips to the batter, ensuring each piece is thoroughly coated. Allow the chicken to marinate for at least 15 minutes at room temperature, or cover and refrigerate for up to 4 hours for deeper flavor penetration and tenderness.
Toasting Panko for Superior Crunch
- Prepare Panko: In a separate medium bowl, combine the panko breadcrumbs with melted butter and grated Parmesan cheese. Toss until the panko is evenly coated.
- Pre-Toast: Spread the buttered panko mixture in a single layer over a large, light-colored baking sheet. A lighter pan helps prevent over-browning. Bake in a preheated oven at 375° F (190° C) for about 6-8 minutes, or until the panko is golden brown and fragrant. Keep a close eye on it, as panko can toast quickly.
- Cool & Transfer: Once toasted, remove the panko from the oven and transfer it back to the bowl. This prevents it from continuing to cook on the hot baking sheet.
Breading and Baking to Perfection
- Breading Station: Remove the chicken from the marinade, allowing any excess batter to drip off. Place the chicken, one piece at a time, into the bowl with the toasted panko. Press firmly to ensure the panko adheres completely to all sides.
- Arrange for Airflow: Transfer the breaded chicken tenders to a wire cooling rack set over the same large baking sheet. This setup is crucial! It allows air to circulate around the entire tender, ensuring even cooking and maximum crispiness on all sides, preventing a soggy bottom. Do not overcrowd the rack; bake in batches if necessary.
- Bake: Bake at 375° F (190° C) for 18-20 minutes, or until the chicken is cooked through and the internal temperature reaches 165° F (74° C) and the exterior is a deep golden brown and wonderfully crispy.
- Serve Immediately: Remove from the oven and let them rest for a minute or two before serving with your favorite dipping sauces.
Pro Tips for Baked Chicken Tender Success
- Chicken Choice: While this recipe uses chicken breasts sliced into tenders, pre-packaged chicken tenderloins work just as well and save you a step!
- Don't Skimp on Pounding: Evenly pounded chicken cooks more uniformly, preventing some parts from drying out while others are still cooking. It also ensures a more tender bite.
- The Power of the Wire Rack: We mentioned it in the steps, but it bears repeating: a wire rack is essential for truly crispy baked chicken tenders. It prevents the bottom from steaming and becoming soggy. If you don't have one, lightly grease your baking sheet and flip the tenders halfway through baking, though results may vary.
- Check Internal Temperature: For food safety and perfect doneness, always use a meat thermometer. Chicken is safely cooked when it reaches an internal temperature of 165° F (74° C).
- Spice it Up: Feel free to add your favorite spices to the panko mixture – a pinch of garlic powder, onion powder, smoked paprika, or a dash of cayenne pepper can add another layer of flavor.
- Batch Cooking & Freezing: These baked chicken tenders are fantastic for meal prep! Cook a larger batch, let them cool completely, then freeze them in a single layer on a baking sheet before transferring to an airtight freezer bag. Reheat in the oven or air fryer for quick, delicious meals.
Serving Suggestions & Flavor Pairings
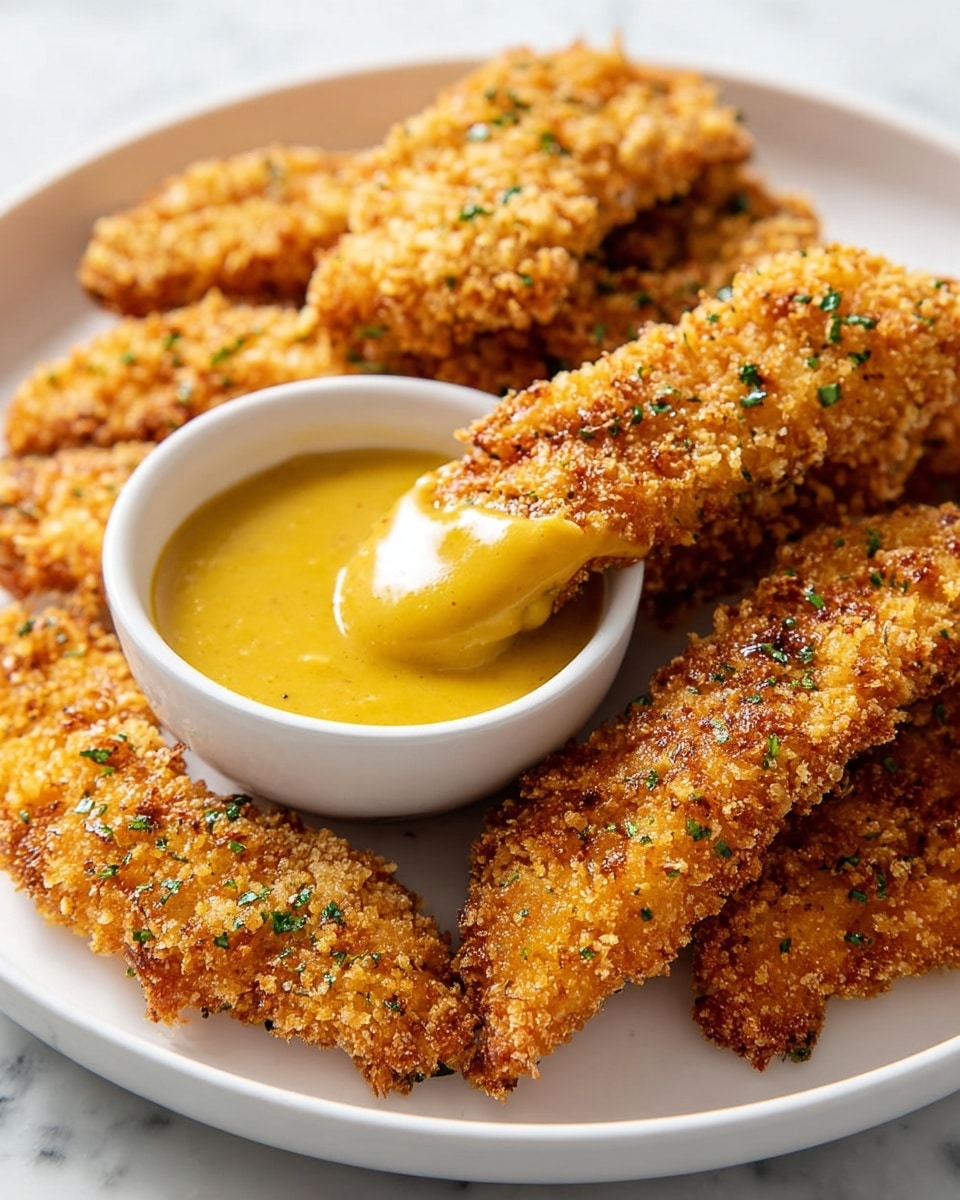
These ultimate baked chicken tenders are incredibly versatile and pair beautifully with a variety of sides and sauces. They have a shatteringly crisp exterior that gives way to incredibly juicy, tender chicken inside, making them perfect for any occasion.
- Classic Dipping Sauces: Beyond the suggested Honey Mustard Sauce (a personal favorite!), consider homemade ranch, creamy sriracha mayo, tangy barbecue sauce, or even a spicy buffalo dip. The options are endless!
- Comforting Sides: Serve them alongside classic French fries, a fresh green salad, roasted vegetables, mashed potatoes, or a vibrant coleslaw for a complete meal.
- Creative Meals: Don't limit them to just dipping! Slice these tenders to top a Caesar salad, tuck them into soft rolls for an incredible Chicken Parmesan Sub, or even chop them up for a unique taco filling. They are truly the ultimate versatile dinner.
Say goodbye to greasy stovetop messes and hello to the healthier, equally delicious, and undeniably crispy world of oven-baked chicken tenders. This recipe proves that you don't need a deep fryer to achieve restaurant-quality results; just a few smart techniques and quality ingredients. Enjoy the satisfying crunch and succulent juiciness that will make these baked chicken tenders a staple in your home for years to come.
