There's an undeniable allure to perfectly crispy chicken tenders – that satisfying crunch followed by tender, juicy meat. For many, this culinary delight often conjures images of deep fryers, copious amounts of oil, and a messy kitchen. But what if you could achieve that coveted restaurant-quality experience right in your own home, with all the crispiness you crave and none of the guilt or grease? Welcome to the world of truly exceptional baked chicken tenders, where the secret lies in a masterful technique for crispy panko.
Forget everything you thought you knew about oven-cooked chicken falling short. We're here to unveil a method that promises incredibly flavorful, shatteringly crisp exteriors and wonderfully moist interiors, making them a family favorite for kids and adults alike. Prepare to transform your weeknight dinners and elevate your snack game with tenders that taste anything but "baked."
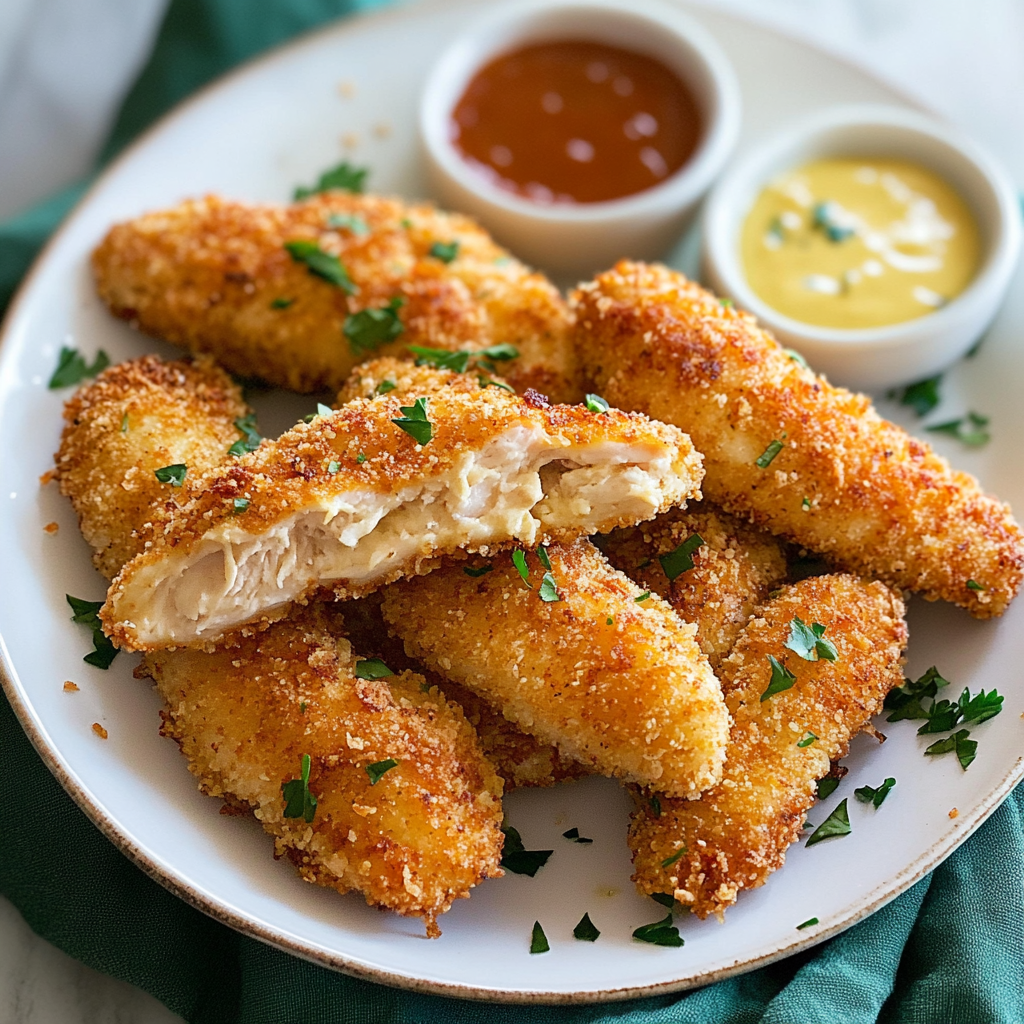
Unlocking the Secret to Superior Crispy Baked Chicken Tenders
The journey to phenomenal baked chicken tenders begins with understanding the core elements that set them apart. It's not just about tossing chicken in breadcrumbs and baking; it's about a strategic approach that maximizes flavor, tenderness, and, most importantly, that irresistible crunch.
The Transformative Power of a Flavorful Batter
One of the primary differentiators for truly exceptional baked chicken tenders is the innovative use of a pre-coating batter. This isn't just a simple egg wash; it's a carefully crafted mixture designed to achieve multiple objectives:
- Unrivaled Adhesion: The batter acts as a sticky base, ensuring every single panko crumb clings firmly to the chicken, creating a robust, even coating that won't fall off during baking.
- Moisture & Tenderness Boost: Ingredients like sour cream are game-changers. They not only add a delicate tang but also infuse the chicken with extra moisture, resulting in remarkably tender, succulent meat that resists drying out in the oven. The subtle acidity also works to gently tenderize the chicken fibers.
- Depth of Flavor: While not overtly "marinade-like," a thoughtfully composed batter introduces subtle layers of flavor. A hint of Dijon mustard adds savory depth, a dash of hot sauce (which can be adjusted for heat preference or omitted) provides a nuanced warmth, and a touch of honey balances the profile with a delicate sweetness. These elements meld together, enhancing the chicken's natural taste without overwhelming it.
- Texture Enhancement: A little flour in the batter helps thicken it, creating a perfect canvas for the panko and contributing to the overall texture profile.
This batter is the unsung hero, creating a protective, flavorful jacket that locks in juices and provides the perfect foundation for crispiness. It’s a technique that truly elevates homemade Baked Chicken Tenders: Achieve Ultimate Crispiness & Juiciness to a new level.
Buttery, Toasted Panko: The Ultimate Crisp Factor
While the batter sets the stage, the panko is the star of the show when it comes to crunch. Panko breadcrumbs are superior to standard breadcrumbs because of their unique flakey, airy texture, which absorbs less oil and crisps up more dramatically. But we take it a step further:
- Pre-Toasting with Butter: This is arguably the most crucial step for achieving restaurant-level crispiness. By tossing the panko with melted butter and lightly toasting it in the oven *before* coating the chicken, you kickstart the Maillard reaction. This process develops deeper, nuttier flavors and creates an incredibly golden, shatteringly crisp exterior that stays crunchy throughout baking. It's the difference between merely crunchy and truly irresistible.
- Umami Boost from Parmesan: Incorporating grated Parmesan cheese into the toasted panko isn't just for flavor; it's for natural umami. This savory depth complements the chicken beautifully, adding another layer of complexity that makes these tenders truly addictive.
This combination of batter and pre-toasted, buttery panko ensures that every bite delivers that satisfying "snap" and golden-brown perfection, rivaling anything you'd find in a high-end eatery.
Step-by-Step Guide to Crafting Your Perfect Baked Chicken Tenders
Now that we've demystified the 'why,' let's walk through the 'how' to create these extraordinary baked chicken tenders in your own kitchen.
- Chicken Preparation: Start with boneless, skinless chicken breasts or tenderloins. If using breasts, slice them lengthwise into 3-4 even strips. For uniform cooking and tenderness, place the chicken strips between plastic wrap and gently pound them to an even thickness (about ½-inch). Season lightly with salt and pepper.
- The Flavorful Batter: In a medium bowl, whisk together the egg, sour cream, flour, Dijon mustard, hot sauce (if using), and honey until smooth. Add the prepared chicken strips to the batter, ensuring they are thoroughly coated. Allow them to marinate for at least 15 minutes at room temperature, or cover and refrigerate for up to 4 hours for deeper flavor infusion.
- Pre-Toasting the Panko: In a separate bowl, combine panko breadcrumbs with melted butter and grated Parmesan cheese. Spread this mixture evenly over a large, light-colored baking sheet. Bake in a preheated oven at 375°F (190°C) for about 6 minutes, or until the panko is lightly golden and fragrant. Transfer the toasted panko back to the bowl.
- Battering and Breading Station: Set up your assembly line: first, the bowl with the chicken in batter, then the bowl with the toasted panko, and finally, a wire cooling rack placed over a clean baking sheet. Working with one piece at a time, lift a chicken strip from the batter, allowing excess to drip off. Transfer it to the panko, pressing firmly to ensure a thick, even coating on all sides. Place the coated tender on the wire rack. Repeat with remaining chicken.
- Baking to Perfection: Ensure your oven is still at 375°F (190°C). Bake the tenders on the wire rack for 18-20 minutes, or until they are golden brown, crisp, and cooked through (internal temperature reaches 165°F/74°C). The wire rack is crucial here, allowing air to circulate around the entire tender, ensuring crispiness on the bottom as well.
- Serve & Enjoy: Remove from the oven and let them rest for a minute or two before serving. These tenders are fantastic on their own, or with your favorite dipping sauces like classic honey mustard, tangy BBQ, or a creamy ranch.
Expert Tips for Flawless Baked Chicken Tenders Every Time
Achieving truly epic baked chicken tenders isn't just about following the steps; it's about incorporating a few expert insights that guarantee success:
- Don't Skip the Pounding: Evenly flattened chicken cooks more uniformly, preventing some parts from drying out while others are still undercooked. It also tenderizes the meat. Use the flat side of a meat mallet for gentle, even pressure.
- The Wire Rack is Non-Negotiable: We mentioned it, but it bears repeating. Baking directly on a sheet pan can trap moisture underneath, leading to a soggy bottom. A wire rack allows hot air to circulate freely, promoting crispiness on all sides.
- Avoid Overcrowding: Give your tenders space! If you pack them too closely on the baking sheet, they will steam instead of crisp, diminishing that coveted crunch. Use two baking sheets if necessary.
- Taste the Batter (before adding chicken): While subtle, the batter is where much of the underlying flavor comes from. A small taste (before raw chicken goes in!) can help you adjust seasonings to your preference.
- Get Creative with Dipping Sauces: While honey mustard is a classic pairing, don't limit yourself! Try a spicy sriracha mayo, a cool avocado ranch, or even a sweet and sour sauce.
- Batch Cook for Convenience: These Healthier Crispy Baked Chicken Tenders: A Family Favorite Recipe are perfect for meal prep. Once baked and cooled, they can be stored in an airtight container in the refrigerator for 3-4 days or frozen for up to 3 months. Reheat in a toaster oven or air fryer for best results.
- Repurpose Leftovers: Any leftover tenders can be chopped and added to salads, wraps, or even made into quick chicken parmesan subs. Their crisp texture holds up surprisingly well.
Why Choose Homemade Baked Chicken Tenders?
Beyond the sheer deliciousness, opting for homemade baked chicken tenders offers a multitude of benefits:
- Healthier Indulgence: You get all the satisfying crunch and flavor of fried chicken without the excessive oil and calories. It’s a guilt-free way to enjoy a classic comfort food.
- Superior Ingredients: When you make them yourself, you control every ingredient. No mysterious fillers, no artificial flavors, just wholesome, real food.
- Family Favorite: These tenders are universally loved. They're a surefire hit with picky eaters and sophisticated palates alike, making mealtime a breeze.
- Cost-Effective: Making chicken tenders from scratch is significantly more economical than buying pre-made frozen versions or ordering takeout.
- Customization: Adjust the seasonings, the level of spice, or the type of cheese in the panko to perfectly match your family's preferences.
- The Comfort Factor: There's something inherently comforting about the aroma of toasting panko and savory chicken wafting through your kitchen. It’s a nostalgic experience that creates lasting memories.
With this comprehensive guide, you now possess the knowledge and techniques to create truly restaurant-quality baked chicken tenders right in your own kitchen. The combination of a flavorful, moisture-locking batter and pre-toasted, buttery panko is the game-changer you've been searching for. So, gather your ingredients, trust the process, and prepare to delight your taste buds with the crispiest, juiciest, and most satisfying homemade chicken tenders you've ever experienced.
